FOREEEE! Why you should add GOLF into your PE curriculum.

In my opinion, Golf, is one of the best “sports” that allows individuals to participate for a lifetime. The sport can be modified for age or injury, while still allowing those individuals to participate and be active. Although it is a sport, there are options that allow you to golf, but not necessarily play a traditional game of 9 or 18 holes. Things like mini golf, par 3 courses, or the increasingly popular Top Golf, allow the average individual to take up the sport as more leisurely.

Why should I add it to my curriculum?

  1. The ability for different ages, abilities, and interest levels to participate while being active is the number one reason! Like mentioned above this is a sport with a lot of wiggle room for how leisurely or competitively you wish to play. According to The National Golf Foundation, “37.5 million Americans over the age of 6 played golf both on a course (about 25.1 million) and off a course (12.4 million) doing things like top golf, or driving ranges”. That is a large number of people participating in some capacity in this sport and in a way that they find fun!
  2. Age doesn’t matter! For so many traditional sports, age is a factor that keeps us from participating. It’s hard to play basketball, football, or soccer as we get older. Although it may not be impossible, it is much more challenging as we age. Golf is a sport that can be modified to fit aging needs. You may have been someone who walked 18 holes in your younger years but maybe you can only walk 9 holes now, that’s ok, you are still participating and staying active. It could be that now you need to use a golf cart to ride instead of walk, that’s ok, you are still being active. There are so many ways to modify the activity to fit the needs of the aging person. According to The National Golf Foundation, “the median age of a golfer is 54 years old”.
  3. The sport is drawing in a younger crowd. The same source stated that “the category of young adults (age 18-34) is among the sport’s biggest customer age segments”. Many of these younger individuals are taking part in off-course activities like the driving range, indoor simulators, or Top Golf.
  4. The ability to introduce more minority groups and women to the sport is important.
    1. In an article on Golf.com, it stated that the number of “African-Americans still only make up around 5% of the nation’s golfers and a tiny fraction of the high-level amateurs and professionals.” This could be due to a lack of resources and the lack of exposure to the sport. Introducing golf into your curriculum can help make the sport more inclusive and expose your students to something they may not otherwise have a chance to experience.
    2. The National Golf Foundation stated that “77% are male leaving  leaving female golfers to make up only a little more than 22 percent”. There is room to introduce the sport to more women and increase the inclusivity of the sport.

How can I add golf to my curriculum?

I understand Golf may not be the easiest thing to add since it is usually an expensive game to pick up, but I have some suggestions based on things I have done in my classroom.

  1. Take a field trip! Do you have a local mini golf course near you? Mini golf is an easy way to introduce the sport and is a great “off course” golf activity. I am lucky, in my city we have a free 18 hole course, you just bring your own club and ball.
    1. Getting golf balls and putters in itself can be a challenge. Ask your community for donations of old clubs. I have found a lot of people have clubs handed down to them that they don’t use. Someone recently told me to call my local golf courses and ask for donations of clubs that may have been left behind and not claimed for a while–GENIUS! You can also call driving ranges and courses to ask for donations of old golf balls they can’t use anymore. You don’t need brand new ones to begin introducing it to your students!
  2. Top Golf! Do you have a top golf near you? Top Golf will usually give a discount to schools that may want to come in during off hours to play. Students love the gamification and competition that Top Golf offers. This is another great “off course” golf activity.
  3. Get a local golf pro to do a putting course. This isn’t my original idea but I think its genius! Call your local golf courses and connect with their golf pros. Many of them are retired and looking for a way to give back to their communities. They may come in and do a putting course/class for your students. We know student’s love when anyone but us teach them!
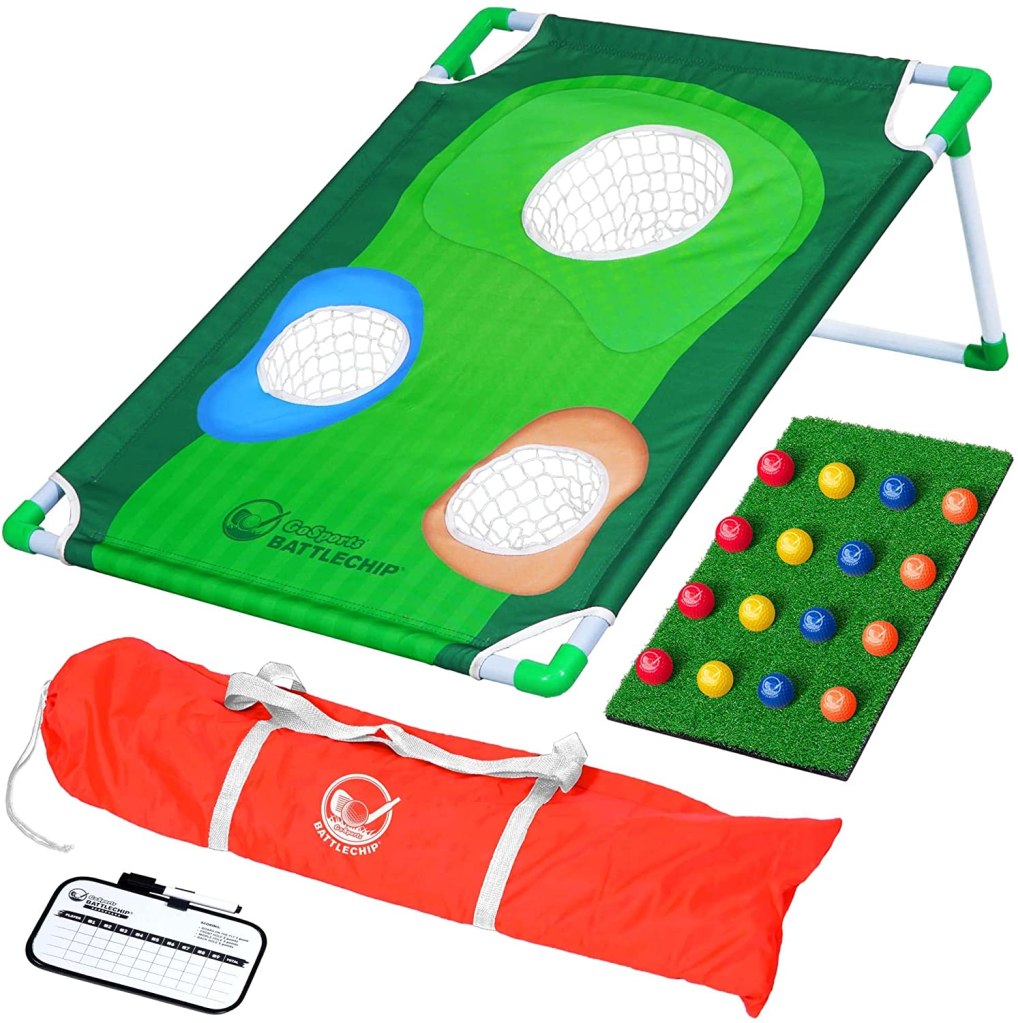
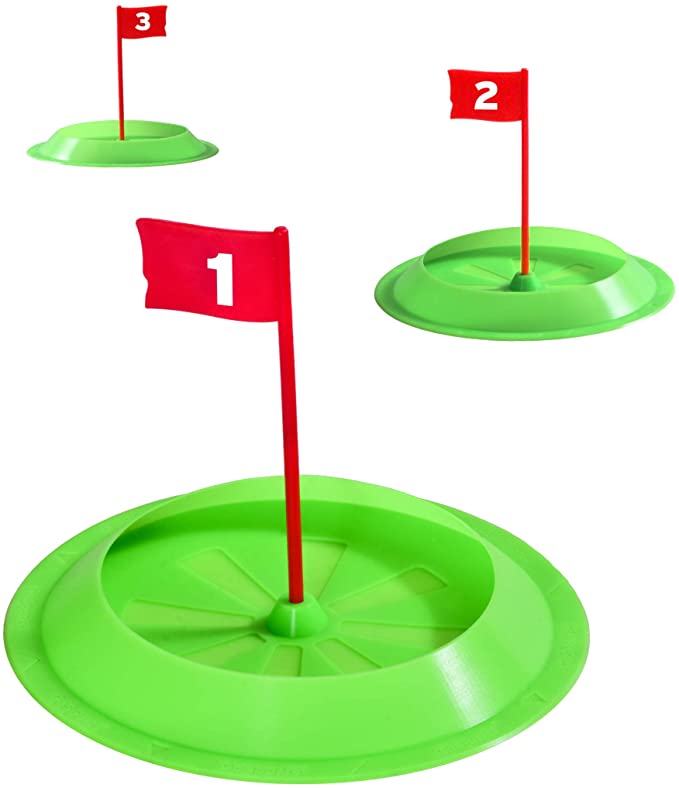
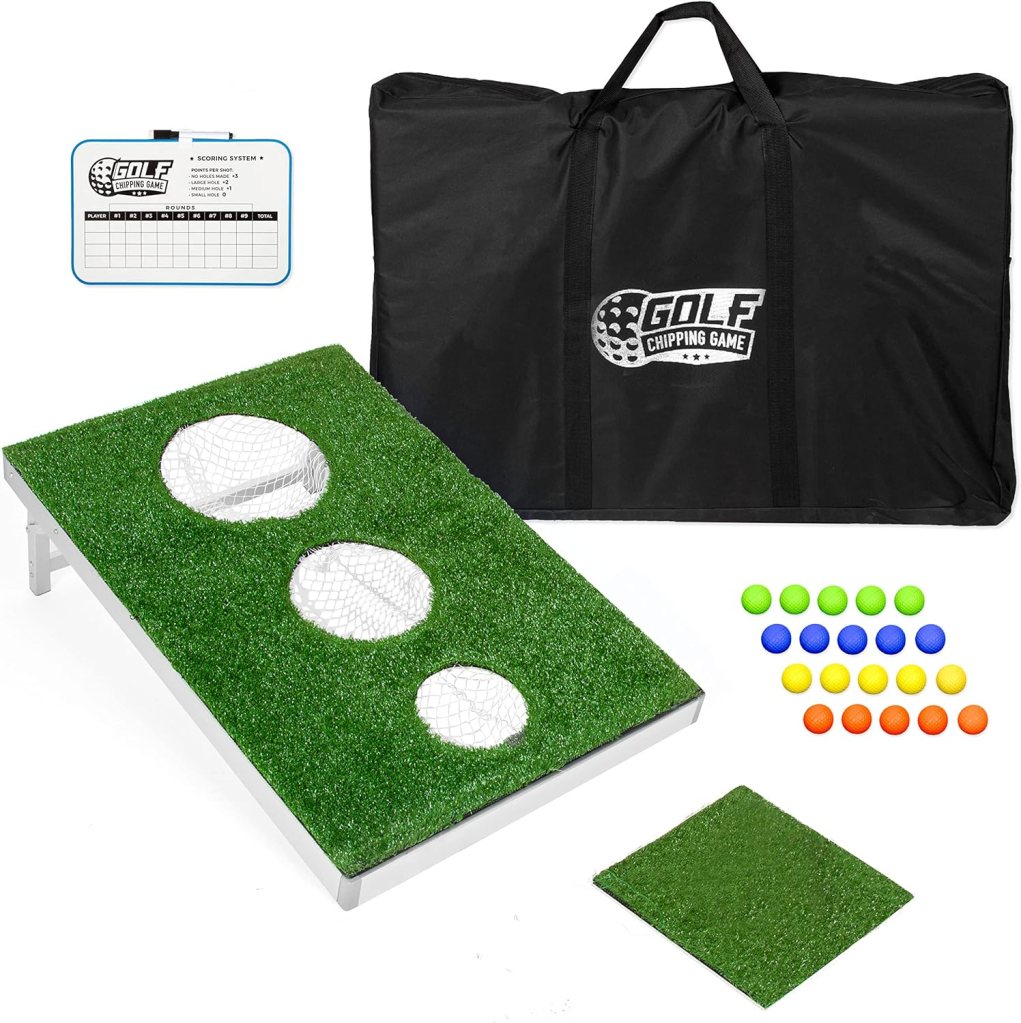
  4. Add backyard games like Chippo! This is something that students can play, be competitive, and get the feel of swinging a golf club. I really like the one linked below from Amazon.
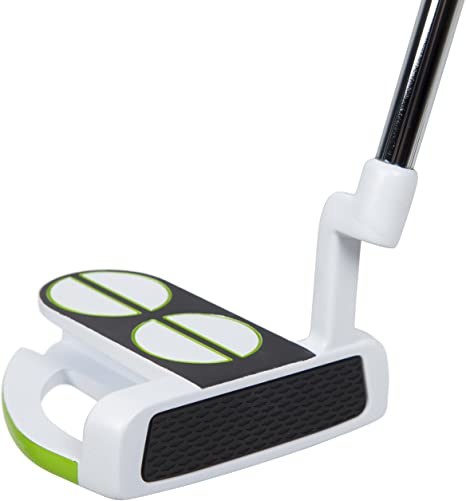
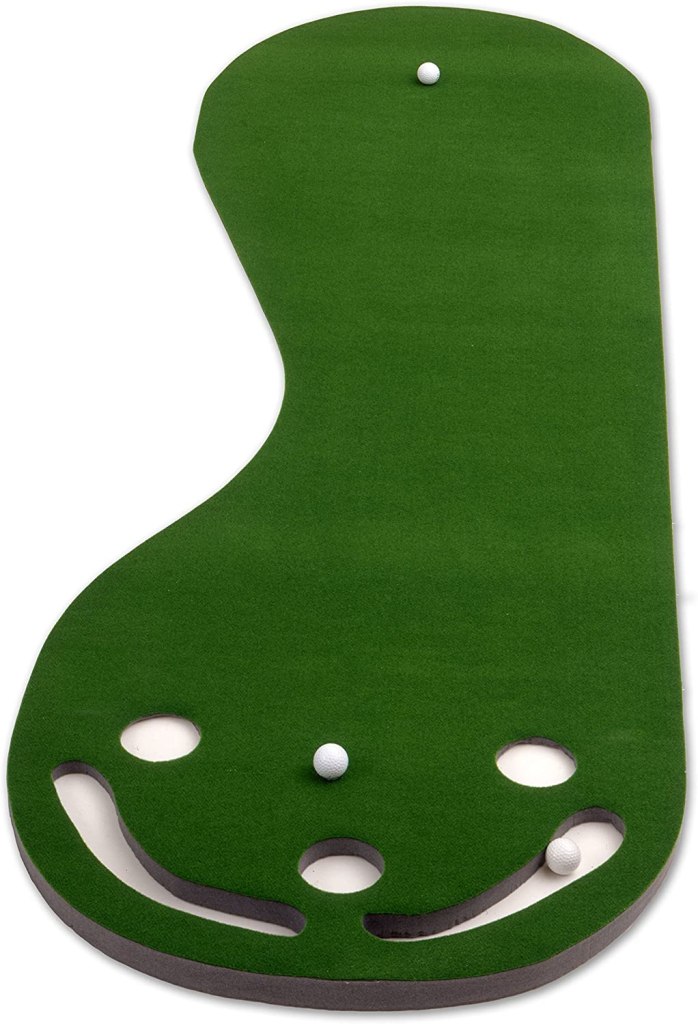
  5. Practice putting. You can get some inexpensive putting mats, or just the putting cups, and practice short game. This is a great way to have students practice so they feel more comfortable transitioning to “on course” play. I have some suggestions linked below for this.
  6. Have them build a mini golf course! This is one of my favorite things I do in my class. It brings in a level of project based learning, stem, and of course GOLF. I have students in groups design and build one hole, then as a class we play all the holes designed and we bring in guests to play. Those guests vote on their favorite! It’s a lot of fun and creates some excitement around the sport. I have this project on my TPT if you are interested.
  7. Watch golf! Golf is becoming easier to watch and a little more mainstream. If you have the resources to play the Masters or other big golf tournaments, do it! Students love having it playing in the background.
  8. Have your students discuss famous golfers. This would allow student choice on who they research and learn about. Encourage them to choose minorities and women too, not just everyone’s favorite Tiger Woods.

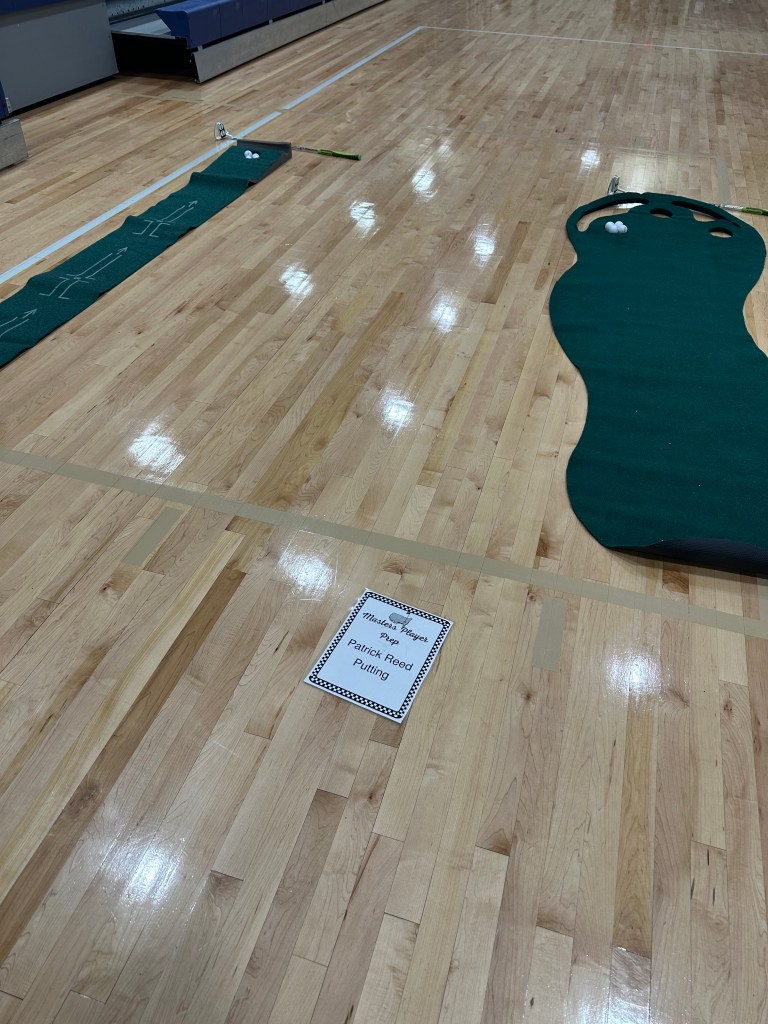
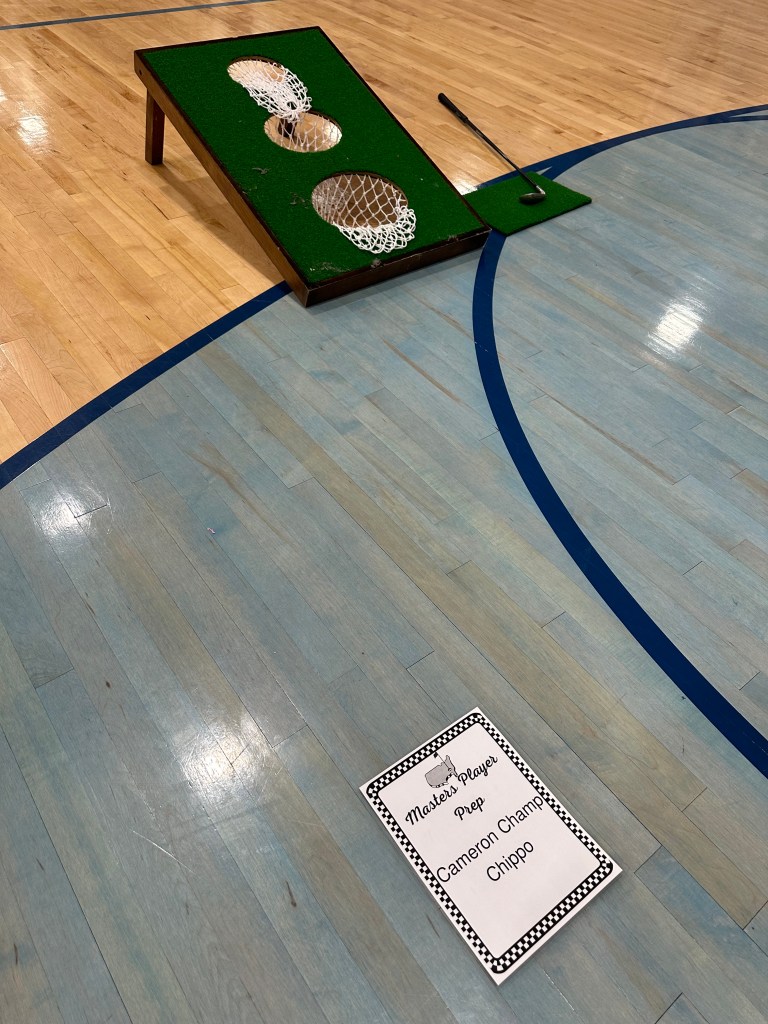
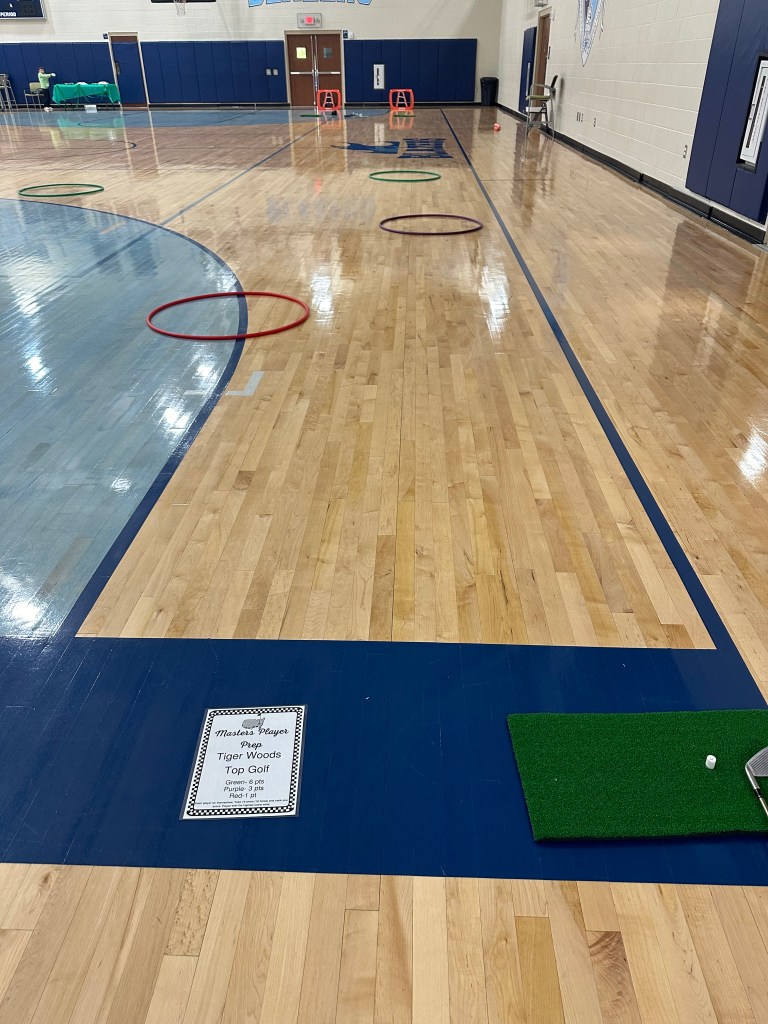
Sample Class- Masters Circuit Complete with Snacks!

For theme classes, dressing the part is 100% necessary! My Pimento Cheese 1.50 shirt was a hit. It is linked by clicking on the photo.

If you can match this up with the first day of the masters then it’s a big win! It gives you an opportunity to teach them about the tournament, the history, and a crash course in golf.

I set up 4 stations

1.Putting- and of course gave it a cute masters name.

2. Chippo- with another fun masters name

3. Masters Top Golf Inspired Station

4. Chipping Station (another fun masters name)

The absolutely favorite was the masters themed snacks at the end.
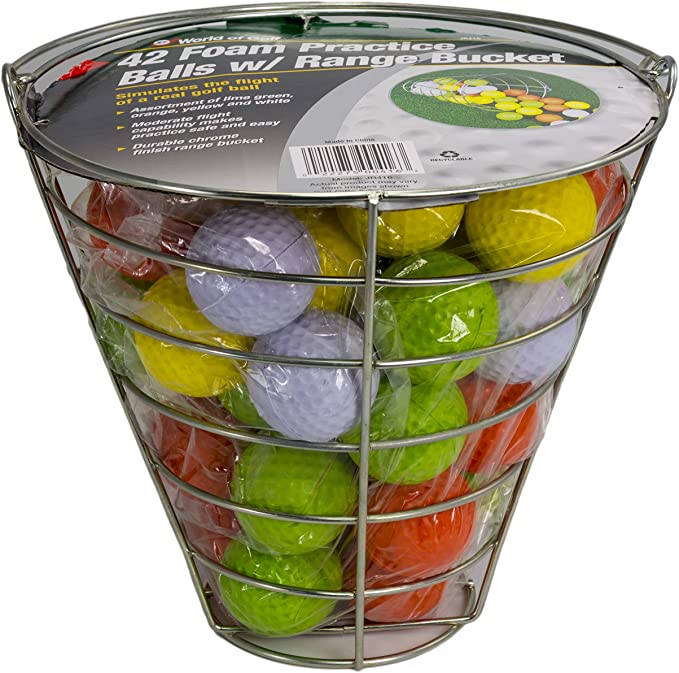
Helpful Equipment

These are some things I have used to teach golf in my classroom! Click on any picture for the link. *links are affiliate links*

Resources

Overcoming Barriers to Physical Activity and Exercise

We all have things that keep us from exercising, whether that be every once in a while or all the time. Those “things” that keep us from meeting our exercise goals are called barriers. Sometimes those barriers are valid, and sometimes they aren’t. Sometimes we just need the tools and the creativity to think outside the box to come up with a solution of how to overcome those barriers.

It isn’t just adults that have barriers to exercise, it’s our students as well. We live in a time where there are constantly things to do, more technological distractions, and other things keeping our students from engaging in enough exercise to meet their recommended amounts. We can also argue that our students meeting their exercise goals is more important as ever as the rates of obesity in our youth are skyrocketing.

So as physical education teachers what can we do? WE EDUCATE.

First let’s talk with our students about what barriers are and give them examples. We can discuss psychological barriers such as fear of injury, personal barriers such as lack of time, and environmental barriers like lack of transportation. After discussing what barriers are and giving student’s examples, we need to have our students identify what their own barriers are. Have them really think about how they spend their time and the main reasons they don’t exercise. You can then have them think about if those barriers are valid or if they can be creative and come up with a solution to overcome them. Sometimes our student’s barriers are things outside of their control such as the amount of homework or lack of the ability to drive. Although some may seem out of their control, sometimes we can help them think of ways they can overcome those barriers and get more active. This is a great opportunity to have students pair up and help each other brainstorm ideas.

I know what you are thinking, “Kaci, my students are just going to say that they hate exercise or just don’t want to do it”. Well, you are right, they may say that, and honestly as frustrating as that may be, that is a valid barrier. So how can we help them find the activities that make them want to be active?

Here is an example of a barrier and how we can help student’s brainstorm how to overcome it.

Barrier: Lack of Time, Personal Barrier

Overcoming the barrier: Could the student take movement breaks while doing homework? Take a walk around their house for 10 minutes every hour they are working on homework? On weekends could they encourage friends to do outdoor activities like hiking or going to a trampoline park instead of playing video games.

I think when talking with our students about this topic it is important to be real and honest with them. Discuss your own personal barriers and how you have to plan or be creative to overcome them. This will help you connect with them and them connect with you. I also think it’s important for them to see that it is common and “normal” for most people to have some struggles with exercise.

If you are looking for a way to incorporate this into your class I have created an activity that has 3 pages of information sheets that you can laminate and hang in your gym or classroom that discuss the different types of barriers, a worksheet for students to write down their barriers and their solutions to overcome them, and 10 scenarios for students to analyze and brainstorm how that individual could have overcome their barriers. You can find it by clicking on the image below.

Click on image for link!

Teaching PE Content Knowledge While Being Active

I am a big believer of delivering KNOWLEDGE and information to my High School PE students that will help them throughout their life. I have very specific things I want them to know, some of those being: recommendations of amounts of physical activity, bone and muscle names, types of flexibility exercises, nutrition information, health topics, etc. These topics, and others, aren’t always easy to convey in PE, since a big goal of our classrooms is to get kids moving and getting their physical activity in. So I started thinking about how I can deliver that knowledge and information WHILE they are being active. I want to stay away from the “sit and get” to allow for more movement and physical activity minutes. With that being said there may be those times where they need to be still and listen to directions or brief information before an activity, but I am trying to find any ways I can to limit that down time.

So how can I teach bones, muscles, nutrition, etc. without having to show PowerPoints, or other methods that have kids being still?

Here are some of my ideas:

  • Create circuits or station activities that have a fact/information as well as an exercise that goes along with what you are doing now. I have a few of these up in my TPT, one for the muscular system and one for flexibility! You can see what I mean in the video below of how I set those up. You can do this with a sport skill you are trying to accomplish, or really any information, just make your “fact” and your “exercise” match up.
Here is an example of how I use fact station cards in my classroom. Both of these are available to purchase in my TPT if interested!
  • Scavenger Hunts! Use the information you are wanting to teach and create a scavenger hunt. Kids are moving and they are getting the information you are wanting to teach. Win Win! You can create a physical scavenger hunt, or a digital online version. I have used an online scavenger hunt where students answered questions but also had to video themselves doing an activity that matched up with the topic we were studying. For example when we were studying body movements, they would have to video themselves doing “hip abduction”. In that movement I can assess they learned the vocabulary I wanted, and that they mastered the movement component as well.
  • Relay Races- I haven’t found a topic in my classroom that I can’t make into some kind of relay race! A good example is when studying the bones, I have giant skeletons for them to label, I could easily just have the students label them, but our goal is movement. So instead I have them label the skeleton in relay race fashion so that they are moving while demonstrating they have mastered the content knowledge.
  • Projects! I teach in a project based learning school so I am always thinking how I can incorporate content knowledge and movement into a project. That project may be demonstrating their knowledge of bone loading exercise by creating a video PSA on the topic. In that one project they are being active, demonstrating knowledge, and problem solving by creating a PSA. Another project I use is for them to develop a resistance exercise circuit where they set it up and teach the class. They demonstrate knowledge of major muscle groups, use of a variety of exercises, exercise form knowledge, and they are moving while creating it, setting it up, and leading the class through it. These projects also allow for so much individuality and choice for the students which keeps them engaged.
  • Escape Rooms- I haven’t personally used any escape rooms in my class YET. It’s a goal of mine to create some, but I can see them being very engaging and having the capacity to allow movement and information retention. If you have any you like I would love for you to leave a comment and let me know!
  • 4 Corners and Jigsaw Activities. These are activities I see in the general education classrooms but there are so many ways these can be used in PE as well to teach information but keep kids moving! These would be perfect for teaching rules of games and practicing skills of the games.

Physical Education to me is just as much about the education component as it is the physical. My goal is to teach them the importance of being active along with introducing them to as many activities as I can that they may decide they like and will keep them being active. Since I am big on that education component they are constantly learning, so I had to find a way to kill two birds with one stone, and the above are some of the ways I do that in my classroom. I don’t teach a lot of sports, since they get that in elementary and middle school, and studies show that the number of individuals participating in organized sports after high school is very very very minimal. So I want to expose them to lifelong activities beyond sports, while still incorporating those sometimes.

Here are some of the activities I talked about during the blog!

How I Used “Common Sports Injuries Station Activity” in My Classroom!

How I Used “Common Sports Injuries Station Activity” in My Classroom!

This activity came about when I was looking for a way to teach my high school students about common sports injuries and prevention. I couldn’t find anything I thought would work, so I created my own activity. Using it has gone so well, and the excitement was high so I decided to dedicate a whole blog post to the activity and how I used it.

First things first, I teach 90 minute classes so this activity took us the entire 90 minutes. If you teach shorter classes I would break the stations up over multiple days.

Set Up: I printed the station cards, and the scenario cards, and laminated them so I wouldn’t ever have to do it again. I also printed the worksheets that they would take with them to each station. I also realized I needed ACE bandages for one of the stations so I purchased 3 at the dollar store to use.

Day of: I taped the station cards around the gym and our athletic training room.

Introduction to the activity: I have a large portion of students who are not athletes, so I knew that if I didn’t capture their attention they wouldn’t care about the activity due to the title. So my question to them was “If you are not an athlete, why is learning about sports injuries important to you?”. Mostly they answered: “so that they could help someone if they were injured”, which is awesome but not what I was looking for. So I had them raise a hand if they had ever had a muscle cramp, most raised their hand. I told them that’s an example of a “sports injury” but it can happen to anyone and that most of what they will learn today could happen whether they are an athlete or not. We also are doing this activity right after learning about bones and muscles and resistance exercise.

Grouping: I chose my student groups based on high flyers and those that usually need a little help so that all students are involved. I had one student get their technology (phone, ipad, chromebook etc) and one group member get the worksheet. Some stations tended to take more time, so I had students star stations 1, 2, 8, 10, 11 so they will stay there double time before rotating.

Then it was time to get started! I let students choose any station they wanted to begin and set a timer for 4 minutes per station. Most stations the allotted time was more than enough time, except for those that needed double time. Each station that needed the double time is highlighted below.

Station Breakdown:

Station 1: Sprains

Includes a video of how to wrap an ankle as well as defining muscle sprain and other questions related. Here they answer questions then practice wrapping an ankle. This is the station you need a few ace bandages for and double time.

Station 2: Types of Bone Fractures

This station is a crossword puzzle of common fractures and their names. Students use their technology to research the different fractures and complete the crossword. This station needs double time.

Station 3: Tendonitis

Here they answer questions related to tendonitis and it’s treatment.

Station 4: Tendon and Ligament Injuries

This station has a short video of an injury (ACL) that students will watch. They answer questions about common tendon/ligament injuries and questions about the video and what happened. The video is not gruesome and no students complained it was too much (just in case you have any weak stomachs).

Station 5: Muscle Cramps

Here they answer questions about cramps, causes, and stretches to relieve them.

Station 6: What is RICE?

Station 7: Scenarios

At this station you have 7 scenario cards that all describe a common injury. I had this station at my “desk” so I could help them with this one. I had them choose one of the scenario cards then write down the causes, symptoms, and treatment. That usually helped them narrow down the injury to 2 or 3. They then used tech to look up the injuries and usually came up with the correct injury! *I also laminated these scenario cards to use over and over*

Station 8: Sports Hernia

This is a double time station. Students have questions about sports hernia and their causes as well as what sports are more likely to have them. There is also a video of stretches they can do to help with sports hernias. Students should also try a few of them at this station.

Station 9: Muscle Strain

Here they answer questions about common places strains occur and how to avoid them.

Station 10: Preventing “Sports” Injuries

This station has a video about preventing injuries for students to watch. They will then answer questions on how they can prevent injury actively and inactively. This also taps into the importance of cross training. You will want double time at this station.

Station 11: Nutrition and Injuries

This station gives and introduction into sports nutrition talking about carbs, proteins, electrolytes and the role each plays in exercise. You will need double time at this station.

Post Activity Discussion

I only have about 7 minutes dedicated to this since I fit this in all in one day, so our discussion is brief but thought provoking. I asked a blanket “What did you learn today?” to some students and then dove deeper into what they wrote for importance of cross training, and prevention of injuries.

All in all this was fun and a different change of pace for the PE classroom! I had great feedback from the students about the activity.

If you are interested in adding this to your classroom, you can click the photo below. I would love to hear how it goes! Feel free to tag me on Instagram @elliottsactiveacademy

Click the photo to be linked to the activity!

What to do about students who can’t participate?

I am going to start this blog post off by saying there are very few instances where students cannot participate in any manner in my class. The only situations I can think of would be an injury and their doctor has written them out of PE for a certain amount of time. Other than that situation, I do my best to find something active they can participate in during the class. My view is that all activities can be modified so students can benefit from the day’s lesson.

What if they didn’t dress out?

I know this is a very popular topic in the PE world, with many educators having the mentality to not “make” students dress out. I understand the various reasons behind this thought process, and if I was in a different school setting I may hop on board that train…but I’m not rolling with that yet. Here is why…

I work at a school where there is a dress code, and I teach high schoolers. High schoolers tend to be a little stinky sometimes and I don’t want them to have to worry about that the rest of the day. Our dress code also calls for khaki pants and a polo shirt. I find that when students forget clothes and participate in their uniform they don’t work as hard due to their limited movement (tight, uncomfortable clothes) and they don’t want to get them sweaty. Here is where I can see schools without dress codes not making students dress out. If at a normal school and students could dress knowing they had PE that day, I think I would be ok with that. They may not fix the “smelly” issue, but they could always change shirts or apply extra deodorant.

I do want to make clear I will never fail a kid for failure to dress out. If I notice a pattern of not dressing out with a student I make sure to talk to them and find out WHY they don’t want to. Most of the time I can solve their problem with either not requiring them to dress due to circumstances, giving them a different place to change, or letting them stay in the locker room longer so they are by themselves to change. I have very little problem with students dressing out for me, and I know that I am lucky in that regard.

Unfortunately sometimes it does happen. They forget clothes, or maybe just tennis shoes, they wore a skirt, etc. So when that happens I try to modify the activity so they can do as much of it as possible without risking injury. Most of the time, I can tweak our activities to make it work for them. I try to keep them from sitting out, or thinking they don’t have to participate because they didn’t dress out. It may be that there activity for the day is a different one from the class for a portion of the class period, but my main goal is still getting them moving.

What if they really can’t participate?

Like I said earlier, there are a few times where a doctor does write a student out completely or another circumstance. In those situations I try to have the student by my assistant, or still work with a team/group to referee, judge, keep score, etc. I want students engaged as much as possible at all times. For these kids it may not be in the way I want, but they can still learn and be included by doing those tasks.

Very rarely do I give a student “busy work” to do instead of participating. That makes them feel left out, which they already feel from not being able to participate. In the rare circumstances that I do, I make sure my work for them relates to what everyone else in the class is doing so they are not missing out on the knowledge portion of the activity. I created a few worksheets and activities specifically for instances like this, but my goal is to have to use them as little as possible. I will link a few options of alternate exercises here, just in case you ever need something for them to do when they can’t do anything.

These are just a few options I have used that will relate back to what we are studying in class and allow them to learn along with everyone else, but keep them from the “active” part of it if absolutely necessary.

Project Based Learning (PBL) in PE

I remember when I started working at my school I didn’t really understand what PBL was or how much I would come to LOVE using it in my classes. Over the last 4 years I have come to appreciate how PBL can help my students understand what I am trying to teach them. Throughout this blog post I am going to talk about what PBL is and how you can implement it in your classroom too!

What is project based learning?

According to PBLworks.org, “Project Based Learning is a teaching method in which students gain knowledge and skills by working for an extended period of time to investigate and respond to an authentic, engaging, and complex question, problem, or challenge.”

An easier way to think about PBL is learning about a subject with the end result being project, presentation, creation that solves a real world problem.

Why should you use PBL in your classroom?

Personally, I love PBL for the real world connections. Students are learning about material and connecting it to the real world at the same time. This increases student engagement and their willingness to do their best and actually attempt to engage in the learning process. We all know our students do better when they can connect the material to themselves and how it affects them or someone they care about. PBL really focuses on that real world connection. I know that I would much rather create a video on the correct squat form than take a written test on it (for example).

PBL also taps into the highest level of Bloom’s Taxonomy which is creation. Most of the time PBL will require students to create something using the knowledge they have acquired.

This type of teaching strategy also usually requires a level of collaboration between students in the class. It requires a level of real world application in the development of the project, not just the project outcome itself. Students of different backgrounds must learn how to work together, divide the responsibilities or tasks of the project, and solve the problem together. All of those are qualities they will need at the next level whether that be higher education or in the workforce. This is the most challenging part of PBL for me as a teacher. We all know there are those students who don’t want to do the work and you must figure out how to motivate them (as well as their group members) to solve the problem.

So how can you use PBL in the PE classroom?

I believe incorporating PBL in PE is simple. In general I want all my students to find something they love that they feel they can continue to engage in for a lifetime. So my entire goal as a PE teacher is to have them understand WHY physical activity is important and how being active affects our bodies. I make this goal something we talk about frequently, so this goal is already a problem we need to solve throughout the year. How can each student find something they love to do that keeps them active. That is a real world problem that I introduce day 1. For some students they believe that activity may be basketball or football, so we talk through how those activities, while great, may not be something they can continue to do when they are 50. They then (hopefully) buy in to the other activities I present throughout the year. I use my projects and PBL to help students see why certain activities are important and why they should do them.

PBL examples I use in my classes

  • Resistance Exercise Infographic: students create an infographic about a resistance topic of their choosing (such as strength training for women, strength training for adolescents, pro’s vs cons of crossfit etc). The goal is to have students understand the importance of strength training in a topic of their choosing. Student choice will motivate more students to do their best and learn something! I have gotten some really awesome infographics during this assignment over the years. https://www.teacherspayteachers.com/Product/Resistance-Exercise-Infographic-Project-7616059
Sample Resistance Exercise Infographic
  • Bone Loading Exercise PSA Video- Students create a public service announcement about the importance of bone loading exercise in different stages of life (adolescence, middle age, elderly). This project is meant to be a group project so students really have to work together to make this come to life! https://www.teacherspayteachers.com/Product/Bone-Loading-Exercise-PSA-Video-Project-for-PE-7693061
  • Macronutrient Choice Board- this is great for in person or virtual learning. Students choose (STUDENT CHOICE!!) a macronutrient and create a graphic (online), poster board (in person), etc about that macronutrient. I used this one year and had students create them in class with donated magazines. Students had to look through the photos and try to find examples of the macronutrient they chose along with researching about that nutrient. https://www.teacherspayteachers.com/Product/Macronutrient-Choice-Board-7616775
  • Create a strength circuit group project- Students work together to come up with strength exercise stations, learn the proper form, and run a circuit workout for the class. This is one of my favorites and the students too because they get to be me for a day!https://www.teacherspayteachers.com/Product/Create-a-Strength-Circuit-Group-Project-7610684
  • Build a mini golf course hole- This may not qualify as PBL as much as STEM (since there isn’t a “problem” to solve, but it is SO FUN! Have your students build a mini golf course hole, then play the holes. When we do this I break my class up into groups and build multiple holes, they build them, then the class plays them (sometimes even other classes come to play) then they vote on the favorite.

These are just some of the favorites I have used in my classes but there are so many more! I challenge you to use PBL in your classroom!

Learn more about PBL– these resources have a lot of information about what PBL is, the research behind it, as well as examples!

https://www.pblworks.org/

https://www.usnews.com/education/k12/articles/what-is-project-based-learning

https://www.magnifylearningin.org/what-is-project-based-learning

What to do when the gym is taken for other activities?

Having the gym taken for other school activities can be STRESSFUL! It seems to always come at a time where things are moving along well in the gym and bam(!) you can’t use it for a day or so. Some of my most stressful times as a teacher have been trying to figure out what in the world to do on those days where I don’t get to teach in my normal environment. In a perfect world I am able to use my outdoor space instead of having to go in a classroom, but there is always rain, non conducive temperatures, or maybe just the absence of a useable outdoor space.

I hope throughout this blog I will be able to give you some ideas of what you can do if this happens to you! Keep in mind I teach high school age kids, so what I do may vary widely from what you feel like you can do.

Sometimes you lose your teaching space for more than 1 day, honestly, I find that to be easier than a day here or there. At least then, I can use that time to really focus on some health units. Below are ideas for things you can do in a few days if you have that time away from the gym…

  • CPR/First Aid- we use studentcpr.com and it is easy to use and understand. It is about an hour and a half of videos about CPR and First Aid with a post test afterwards. The fun part is the students get an emailed CPR card after they pass the test! Our school also has a few CPR dummies that we use for a hands on portion. Sometimes our nurses come in and do it for me, but most of the time I lead it. I have also had the local Fire Department come out and speak at the beginning of this unit to talk about the importance of CPR/First Aid. It is a great hook and gets them invested in really paying attention. I also spend a lot of time making sure students know where the life saving equipment is in our school so I created a first aid scavenger hunt for this mini unit so students can search the school and find the AED/First Aid Kits/First Responders etc. (If you are interested it is here: https://www.teacherspayteachers.com/Product/First-Aid-Scavenger-Hunt-7644532)
  • Nutrition- depending on how long you have you will need to decide how in depth you are going to go into nutrition.
  • Anatomy- Introduce the skeleton and have them learn the names of the bones and/or muscles. One of my favorite activities is to have them build a giant skeleton and label it!

But what do you do when you have one random day without the gym? You don’t have enough time for a whole unit…so what do you do?

  • Tackle one health related issue
    • Drugs/Alcohol/Vaping
    • Social Media Issues
    • Self Esteem and Bullying
    • Healthy Relationships
    • Motivation- Intrinsic/Extrinsic
    • Stress Management
    • Mental Health
    • The list could be so much longer. Take one of your health topics and use your day away from the gym as productive time to tackle of one these issues.

Sometimes you walk into school and your gym is taken with no warning…and those days you may just want to watch a movie. I get it, that’s real life! Here are some of my favorites (again I teach high schoolers) that can inspire great conversation post movie.

  • A Mile In His Shoes (Amazon Prime) Rated PG
  • The Perfect Game (Amazon Prime) Rated PG
  • Invincible (Disney+ or Amazon Prime) Rated PG
  • McFarland USA (Amazon Prime) 13+
  • The Rookie (Disney+) Rated G
  • Just Eat It! Documentary about food waste (YouTube, Hulu)
  • Glory Road (Disney+) Rated PG but some language
  • Everybody Walk, The Walking Revolution Documentary (YouTube) – only 30 mins and a great way to get students talking about how they can be more active
  • No Excuses Documentary (https://www.pecentral.org/mediacenter/video_noexcusesfilm.html)
  • Miracle (Disney+) Rated PG

I surveyed some teachers and asked them what they do when they lose their gym, here were there answers:

  • Cardio Drumming- I could never do this because our building is small and the other teachers would not love us making a huge amount of noise, but I LOVE THIS IDEA.
  • Chess and other board games
  • Speedstacking
  • Juggling
  • Fitness Videos- this is great if they give you the cafeteria or other big area, maybe not as much in a classroom. Fitnessblender on YouTube is a fantastic resource for easy to use fitness videos.
  • Fitness Jenga
  • Tabletop Games- there are so many options (table basketball, shuffleboard, bowling, etc) out there if you have a budget for them!
  • Yoga/Mindfulness Activities

The best way to plan for a day out of the gym…GO ON A FIELD TRIP! This only works if you know a good bit ahead of time, but makes the day fun! Again I teach high schoolers so going off school grounds is a little easier than if you teach younger kids. Here are some field trip ideas:

  • Mini Golf
  • Bowling
  • Local Park
  • Grocery Store- sounds crazy but its more fun than you think! I do this field trip every year during my nutrition unit and they use the grocery store to go on a nutrition label scavenger hunt (https://www.teacherspayteachers.com/Product/Nutrition-Label-Scavenger-Hunt-7382485)
  • Ice Skating
  • Local Health Club- if you contact them they may can do a special fitness class for you
  • VIRTUAL Field Trip

Losing the gym can be a headache, but there are so many ways to get students moving inside a classroom or cafeteria. The biggest thing to remember is to make sure that the activity or topic you choose is still productive and fits within your standards. The students won’t be happy about losing a day of fun in the gym, but if you keep your enthusiasm and make sure to have some fun when you are displaced, they will too!

Valentines Day in PE

Do you celebrate the holidays in your classroom? I LOVE EVERY HOLIDAY. It is probably a trait I got from my Mom. She always loved, and still does, decorating and celebrating for each holiday. I try to have that love for the holidays carry over into my classroom, it makes it fun for me and makes my students feel special. At first I thought my high schoolers would dislike celebrating them, but in fact they LOVE THEM.

It doesn’t matter to me what unit I am in the middle of, on a holiday we will do something themed for that holiday.

With Valentine’s Day approaching I have my fun day (really 2 days since we are an A/B day schedule) planned. I used these activities last year and they were so fun! The students talked about it for weeks…and I have had new students this year ask if we are going to do it again.

I teach 90 minute classes so I am able to do pretty much all of this that I am going to link below, but if you teach shorter classes take the things you like and use those. I am also going to list equipment needed and any links that I have.

  1. Warm Up- This or That activity. The google slides have choices for students to choose which they prefer, all valentines themed of course! The next slide has the exercise they get for the choice they made (complete with gif’s so you don’t have to demonstrate!). There are 5 choice slides, so for me I do each activity for 1 minute so that this is a quick 5 minute warm up and intro to the lesson.
  2. Minute to Win it Games! Most of these are more than 1 minute but I liked calling them this and each one is incredibly fun and competitive. The slideshow linked below has 8 different games (slides include directions for how to play, timers, and point values) all have some sort of valentines reference. It may be that I used red cups or red cones, but I tried to make it all connect in some way. Most of the games are active but there is also a name that song game (complete with amazon music playlist) that they loved!!! For these games I split my class in 4-5 teams for all these games, the team with the most points in the end wins!

For holidays I also make sure I dress the part! I wear a valentines t shirt, or headband or both. We are lucky as PE teachers we get to be a little eccentric 🙂

I also try to have PE related Valentines and candy for each student. These from a TPT seller are so cute! https://www.teacherspayteachers.com/Product/Sports-Valentine-Cards-4407623

These activities will give them a memorable day and keep them active and engaged for your entire class period! I promise! I hope you enjoy these freebies, please let me know if you have any questions about how I did this in my classroom! I would love for you to check out my resources on my TPT here: https://www.teacherspayteachers.com/Sellers-Im-Following/Add/Elliotts-Active-Academy

How to Teach about Resistance Exercise in PE

It is no secret to any of my students (current or past) that my absolute favorite unit to teach is the unit on RESISTANCE EXERCISE. In the beginning of the year when we talk about the units and things we will discuss it’s hard to hide my love for this unit. I spend the most time on it during the year, and to me it’s the most fun! Students may not always think they will love it, but in the end they do! *Helpful hint, I teach 9th graders so this is geared to high schoolers*

I am partial to this unit for a lot of reasons

  1. The importance of students understanding about their bodies and knowing where bones and muscles are.
  2. When it comes to being active for a lifetime, strength training is important across all age groups and is something they can do for a lifetime.
    • Adolescents- because they are building their framework and in athletes strength training reduces the rate of injuries
    • Middle age- because you are fighting losing muscle mass and the affects (in women) of menopause
    • Elderly- because they are fighting losing muscle mass as well as brittle bones and the stronger they are, the more active they can be
    • among many other benefits
  3. The students LOVE when we start lifting weights and talking about how to properly do exercises.
  4. This unit has so many opportunities for project based learning.

Here is a quick run down of my unit and some activities and resources I use when teaching this unit.

I introduce my unit by using Goose Chase, a virtual scavenger hunt. I have about 30 mins worth of questions (I teach 90 min classes). Some are active like having them demonstrate a plyometric exercise, and some require research like having them name benefits of strength training. It’s a great way to have kids see where we are going in the unit by dipping their toes in, but not give away all we are going to learn.

Then I introduce the skeletal system and discuss

Then comes the most fun…THE MUSCULAR SYSTEM

  • Functions of the muscular system and benefits of resistance exercise (specifically throughout the lifetime). I have done activities in the past where I give them a whiteboard and have them research benefits and see which team can come up with the most benefits in a designated amount of time.
  • Names, locations and functions of the major muscle groups. I try to break them down 2-3 muscles at a time and go over name, location and function then I have students group up and comes up with 2-3 exercises they may know for those muscle groups and then be able to demonstrate them to the class. I have a few activities that we do after this so students can master that material.
  • Sets, Reps, Muscular Strength vs. Muscular Endurance- after this I usually throw in a group project where they work in a group to create, and run for the whole class, a resistance exercise circuit. It is here if you are interested (it does require students access to some equipment like medicine balls, stability balls, step, etc) https://www.teacherspayteachers.com/Product/Create-a-Strength-Circuit-Group-Project-7610684
  • *sometimes* we talk about the principles of training. Kind of like above, I read the class. Some classes are very into learning about strength training and it works to add this in, some do not. https://www.teacherspayteachers.com/Product/Principles-of-Training-Worksheet-with-Answer-Key-7453985
  • Different strength training types they have heard of- Olympic lifting, plyometrics, crossfit etc.- I have split them up into groups and had them jigsaw this. Give each small group a different type and have them learn about it, then come together to inform the rest of the class. I have also had them do a project where they create an infographic about one of the types that they find most interesting.
  • Fundamental movements
    • Squat, Hinge, Push, Pull, Lunge- if I am able to get them in our schools weight room we do, and we go over proper form for this movements. If the weight room isn’t available I have class sets of dumbbells that we use to go over this movements. At this point they have been exposed to most of these and are usually able to direct me through a movement easily. I also talk about here how they can modify these exercises to make them easier or harder. This is a great way for them to understand how to modify for themselves if they are active/athletes/etc or as they get older or may need to modify for injury.

It seems like a lot, and it is, but I have found my students really really enjoy this unit. I also have many of them come back and tell me how prepared they were for their anatomy class or athletic training classes that they end up taking as electives.

On each day I make sure that I am doing a class activity that is also getting them moving but is specific to strength training. Some of the activities above are active and that helps, but the ones that may not be, I add an activity before, during, or after the non active things. I have many that I choose from, or I use videos like this one https://www.youtube.com/watch?reload=9&v=fj4ervYA74c which is NFL Play 60 and it focuses on strength. Fitness Blender is also a great resource for workouts that you can filter to the time, body part, intensity that you need for your classes. https://www.fitnessblender.com/

Teaching About Heart Rate in PE

One of the most important and (I think) useful units I teach in my 9th grade PE class is on Cardiorespiratory Exercise. During this unit I spend a good bit of time teaching about heart rate. I think it is important for them to learn:

  1. What is heart rate and how does exercise affect it?
  2. How to manually take heart rate and what is considered “normal”?
  3. What is our target heart rate range for moderate to vigorous exercise and how do we calculate it?
  4. What happens to heart rate during different intensities of exercise?

In this post I will take you through each of these 4 questions and tell you how I direct my activities to answer these questions.

What is heart rate and how does exercise affect it?

Most students at the 9th grade level have been introduced to heart rate but they don’t really understand exactly what it is, but they do understand how exercise affects it. I use this question as an introduction to a lesson and combine it with a warm up like pictured below. After the warm up, I will ask them what happened to their heart rate throughout the exercise. They should answer that it increased the longer they exercised (hopefully!). That leads us right into making sure they understand what heart rate is. I also love to do a poll of who knows how to calculate their heart rate…most students will raise their hand but I bet they are relying on technology to take their heart rate and don’t know how to do it manually.

How to manually take heart rate and what is considered “normal”?

I always get an eye roll (or two) when I ask students to learn to manually take their heart rate. They want to rely on their technology to do it for them, so I make sure to explain WHY we need to be able to do it manually just in case.

To demonstrate how to take heart rate here are my steps…

  1. I play a youtube video of someone manually taking heart rate with instructions. I would link it, but honestly every year I’ve used a different video. The goal is to create my own…eventually.
  2. Review the video and make sure they know
    • Where to take heart rate
      • Left wrist on the thumb side
    • How long to count
      • I have my students do a full 60 second count until I feel they have had enough practice then let them cut it down to 30 seconds. We talk about how 60 seconds is the most accurate. *Make sure they are not using their thumb to take pulse*
    • Why we take radial pulse versus carotid
  3. They practice finding their radial pulse and raise their hand if they have trouble finding it. I am able to circulate and help find the pulse for anyone having trouble.
  4. Once the whole class has found their radial pulse we will together take a 60 second resting heart rate. I will control the timer so that all they have to do is count.
  5. I have them pair up or group up and practice taking each others heart rates and make sure that they are within 5 bpm of what they took for themselves. Anyone way off keeps trying. With Covid now in the picture this is something you may or may not be able to do.
  6. Bonus: if you have a class with a good number of smart watches with technology have them compare what they took manually with what their smart watch says. You can get some good questioning out of those numbers. Why are they different? Which is the most accurate? How do the smart watches even calculate the heart rate? Etc.

What is our target heart rate range for moderate to vigorous exercise and how do we calculate it?

Here is the part of learning about heart rate where they must do math, yes math, and yes they hate it a little bit. It is so important before you have them calculating their target heart rate ranges that you clearly convey the WHY! If you don’t, you will lose them before you ever begin. In my class, we do a whole unit on learning about the FITT of the 4 types of exercise so I can tie in the intensity for cardiorespiratory exercise is “moderate to vigorous”. We talk about how if we are not getting into the moderate intensity that we aren’t meeting our daily/weekly recommendations of cardio exercise. I also try to bring in some real world examples like Orange Theory, a gym where how hard you push yourself depends on your heart rate and getting into the orange or red zones. If you aren’t familiar with Orange Theory here is their website for you to explore https://www.orangetheory.com/en-us/. There are great video examples of this, and I have had a guest trainer come in to talk about those zones. There are a lot of gyms/fitness centers using heart rate technology today this is just once example. Those are real world applications for what you are about to teach and can help you hook students before doing the dreaded math.

When I teach this I use this worksheet I created (https://www.teacherspayteachers.com/Product/Target-Heart-Rate-Range-Multi-Page-Activity-for-PE-7419391) which has a place for them to do their calculations for maximum heart rate, moderate heart rate range vigorous heart rate range, a place for them to write their target zones clearly so they will have them, an activity for them to track their heart rate through different intensities of exercise, and an exit ticket for the activity.

Before I give out the worksheets, I do an example on the whiteboard. I use myself as an example (it’s fun to have them try to guess my age since it’s needed for all the math calculations), and just have them watch. Next I do an example with someone in the class, most kids are the same age so in reality I am doing it for all of them. Next I have them use the worksheet to calculate their maximum heart rate and moderate to vigorous ranges. I use 50-70% for moderate and 70-85% for vigorous, these are based on ACSM recommendations.

After they have calculated and peer review each others work, we begin the activity on page 3 of the above worksheet. I have 90 minute classes so I am able to get through both of these in the same day usually, but if you have shorter classes you may have to do the calculations one day and the activity the next class. The activity takes them through different intensities of exercise and has them take their heart rate after each step. This allows them to see how their heart rate changes as the intensity of exercise changes. They can compare the heart rate they took with their target heart rate ranges and see if they were able to get themselves into the moderate/vigorous category. The end of the activity has them rest and see how long it takes their heart rate to return to resting.

Page 1 of my 4 page “Calculating Heart Rate Range Multi Page Activity”
https://www.teacherspayteachers.com/Product/Target-Heart-Rate-Range-Multi-Page-Activity-for-PE-7419391

What happens to heart rate during different intensities of exercise?

After the activity I use the exit ticket portion of my resource to talk about what happens to their heart rate during the activity. They are able to discuss why they believe their heart rate acted as it did and this opens up great discussion for how heart rate acts differently in different people. I also discuss why their heart rate may or may not have returned to resting. It is wonderful to watch their wheels turn when you ask these higher level thinking questions.

Doing this at the beginning of cardio unit allows us to use heart rate in many different ways and for many different activities. I know a lot of them will fall back into using their technology to take their heart rate, and I am ok with that since now I know they understand that number, what it is, and how they can use it to modify exercise as they need to.

I would love to hear if you are teaching heart rate in your PE class?